Alaska Good Life
  • The Good
  • The Food
    • The Brew
  • About

Salmon Salad Sandwiches

8/31/2014

 
This is my go-to alternative recipe to the classic tunafish sandwich. The recipe is adapted from a sandwich recipe book that we got for Christmas from my mom. 
Picture
Picture

Instructions

Ingredients

  • 2 jars of salmon, drained
  • 1/2 cup red onion, diced
  • 2 celery stalks, with leaves, diced
  • 1/2 cup kalamata olives, coarsely chopped
  • 1/2 cup sun dried tomatoes, coarsely chopped
  • 2 tbls capers, drained
  • 3 tbls Italian parsley, chopped
  • 5 tbls basil, chopped
  • 5 tsp red wine vinegar
  • 2 tbls lemon juice
  • 2 tbls olive oil
  • Salt and pepper
  • Fennel, sliced
  • Arugula leaves

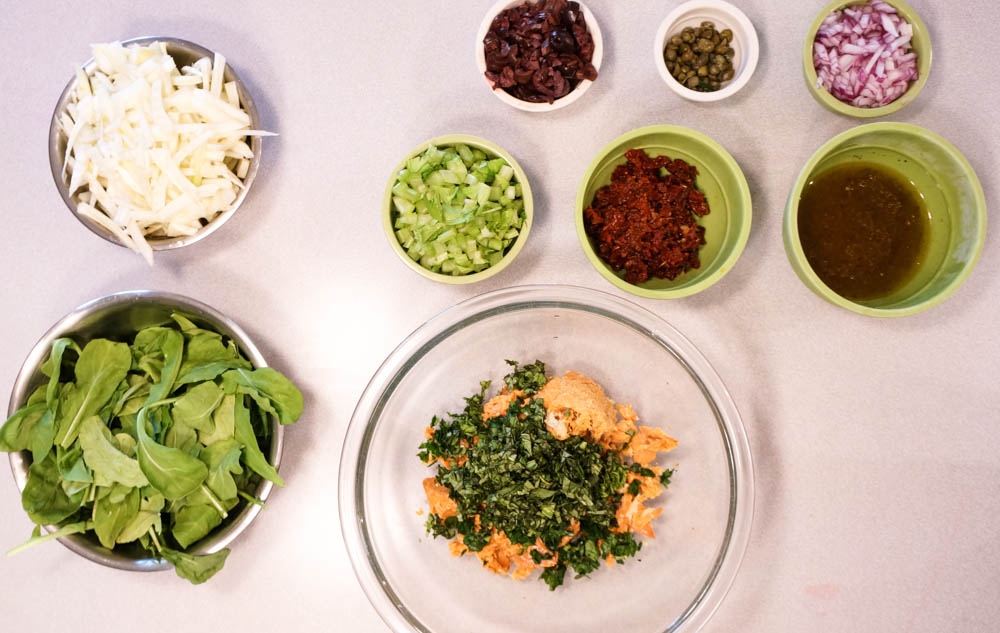
Mix salmon, onions, celery, olives, sun-dried tomatoes, capers, parsley, and basil. In a separate, small bowl, whisk together olive oil, lemon juice, vinegar, salt and pepper. Mix together with salmon mixture. 

Serve on a sliced, toasted baguette and top with fennel and arugula. 

Pasta Puttanesca with Canned Salmon

8/31/2014

 
This recipe comes from Kathy's kitchen. We have adapted it from the original Martha Stewart recipe. It makes for a great weeknight, very fast meal.

Ingredients

  • 8 oz whole wheat spaghetti noodles, cooked al dente 
  • 3 tbls olive oil
  • 6 cloves of garlic, minced
  • 1/2 tsp red-pepper flakes
  • 10 anchovies, crushed
  • Two 14.5 oz cans diced tomatoes
  • 3 tbls capers
  • 1/2 cup kalamata olives, chopped
  • 1 jar of salmon, drained

Instructions

Cook pasta in boiling, salted water until it's almost done; drain. We finish cooking it in the pasta sauce. While the pasta is cooking, heat the olive oil in a large skillet and cook the garlic, red-pepper flakes, and anchovies for 1-2 minutes. Add tomatoes, tomato juice, capers, olives, and salmon. Lower heat to simmer and cook, until slightly thickened, about 5 minutes. Stir the pasta into the sauce and finish cooking, 2 minutes. Serve and enjoy. 

Adam's Salmon Dip

8/31/2014

2 Comments

 
This is my favorite salmon dip. It makes great a brewing snack. Sometimes we eat it with a salad for dinner. Like a good dinner party, it's fantastic after the ingredients mingle for a few hours. 

Ingredients

  • Four half-pint jars of salmon
  • Grate a medium onion using a box grater
  • 3-4 dill pickles, grated
  • 1/3 cup mayo
  • 1/3 cup yellow mustard
  • 2 tsp liquid smoke
  • Dried dill
  • Cayenne pepper
  • Black pepper

Instructions

Drain the liquid from 3 of the 4 cans of salmon. 
Drain half of the liquid from the grated onion.
Mix ingredients from salmon to liquid smoke together. Add dill, cayenne, and pepper to taste. 

Take the dip to the 
                       next level, 
                                and make a tuna melt:

Sough dough bread
Broccoli or spiced clover sprouts
Tomato
Cheddar cheese
Salmon dip

Cook this in a skillet as if you were making a grilled cheese sandwich. It's good. 
2 Comments

Canning Salmon

8/31/2014

 
Every summer we clean out our freezer and process the uneaten filets from the past year. My favorite preparation is simply salt and salmon. This lends itself to great fish that is ready for sandwiches, dips, and pastas. 

Here is the UAF publication for a more thorough explanation of the process. 
UAF Publication
File Size: 725 kb
File Type: pdf
Download File

Quick Reference Recipe

1 filet yields about 6.5 half-pint jars
1/2 inch for headspace
1/4 teaspoon kosher salt
90 minutes at 10 pounds of pressure after a 10 minute vent
32 half-pint jars fit in one canner

Step-by-step Process

1. Prepare Fish

Skin salmon and cut into strips that are the nearly as wide as the jar is tall. Leave room for headspace. 


Apparently, you don't have to skin them; however, we have never tried this. Next time, maybe. 

2. Prepare Jars

Sterilization is essential from here on out. Our kitchen literally turns into a fish processing plant. Clear all counters to give yourself more room now and less to clean up later. 


Check the rims and jars for cracks. 
Picture


While we can reuse the jars time and again, we must buy new lids every time. Even though they are from the factory, check the seals to see that they are smooth. Defects in the lids and jars can cause problems during the canning process. It's worth your time. 

Add the lids to a pot of nearly boiling water. This makes the rubber soft, and sterilizes lids and utensils. Be sure to place the lids seal down in the water. This allows you to pick them up more easily.  

3. Pack Jars

Think assembly line when setting up for this part. 

Pack the jars leaving 1/2 inch of head space for half-pint jars. 

If we cut them just right, we can pack the jars full with minimal dicing. Cut filler pieces from a filet and pack them tight. 
Picture
Picture
Add 1/4 tsp of salt to each jar. 
Picture

4. Prepare for Canning

With a wet paper towel soaked from the hot water in the pot, wipe the rim of each jar to ensure a good seal. 

Using a magnetic wand that comes in canning kits, pull the lids out of the water and place on the jars. Screw the ring on just barely tight. 

The ring is meant to hold the lid in place when the jar contents expand during the canning process, but it needs to be loose enough to allow steam and liquid to release or the jar can explode. 
Picture
Picture

5. Canning

Picture
We can outside on our back deck when the weather is good because I don't love the smell of boiled salmon, which hangs around the kitchen for a while after canning. 
Picture
Load the canner with water halfway up the first layer of jars. Stack the jars exactly on top of each other. 
Place the lid on the canner. Tightening it like lug nuts to get the lid evenly and snuggly screwed on. Check to see that the gap between the canner and the lid is equal all the way around. Turn on the flames.

Once a steady stream of steam establishes itself, the canner is venting. Vent the canner for ten full minutes. 

After ten minutes, place a ten pound weight (dependent on elevation) on the vent and adjust the heat so that the weight rattles every 60 seconds. 

Set the timer for 90 minutes. 
Picture
As the jars cool, they seal to the sound of the lid making a popping noise. It is the single most rewarding step (aside from eating the fish) in this process. Wipe down the lids before they dry.
Picture
Erika and her canned fish
Picture

6. Remove from Canner

Let the pressure release naturally, waiting for the pressure dial to read zero before opening the lid carefully. Extract the molten jars and place them on a rack. Sometimes we find that jars cracked/exploded, no big deal. We just save the jars that make it.
Picture
The canned salmon will be good for a long time. Always inspect the jars before eating. Bulging lids, strange smells and colors, or cracked jars make the salmon inedible. When in doubt, throw it out. 

I have three recipes that I love to cook with this canned salmon.

  • Salmon Salad Sandwiches
  • Salmon Dip
  • Pasta Puttanesca
    Picture
    Picture

    Archives

    November 2019
    September 2019
    January 2019
    October 2018
    October 2017
    July 2017
    November 2016
    September 2016
    June 2016
    November 2015
    October 2015
    June 2015
    November 2014
    August 2014
    March 2014
    December 2013
    October 2013
    August 2013
    July 2013
    June 2013
    March 2013
    February 2013

    Categories

    All
    Barbecue
    Cajon/Creole
    Canning
    Charcuterie
    Cocktail
    Dinner
    Fermentation
    Salmon
    Smoking

Powered by Create your own unique website with customizable templates.